Sunday, November 20, 2011

This Post was brought to you by the Number 6


Here is another little Home Decor creation to brighten up our little hallway to the Studio.
It's amazing how changing a door can change everything. All of a sudden, the hallway was about light. In the evening, that light story was a sad one. So we needed to change out the light fixture desperately.
I wanted something like this. 
However, my budget was closer to $5 than hundreds. I also had only about 8.5" to work with.
I started Googling and Pinterest searching for DIY Capiz Shell Chandeliers, and I found one.  However, her tutorial though fabulous is only a series of pictures and is for a much larger chandelier. This left me with a general idea and a large number of questions.
I did purchase a 5" lampshade at Christmas Tree Shop for $1. I bought 2 rolls of wax paper at the Dollar Tree.  I purchased a 1.5" circle punch with my 50% off coupon at AC Moore.
However, I couldn't tell how she attached the circles to the shade, and my hole punch was just making a frustrating mess until it finally jammed completely.
So here are my written instructions to make an
8.5" Faux Capiz Shell Chandelier
My apologies for my lack of images. Feel free to check the original tutorial for any images.
Materials
5" lampshade
2 rolls of standard size wax paper
1.5" circle punch
wire cutters
wire
2 small brass hooks
low wattage bulb (we used the type that looks like a candle)
standard single bulb light mount
 (similar to the ones found in a closet or unfinished basement)

Take 6 large sheets of wax paper.
Layer them ontop of eachother.
Cover with fabric.
Iron until the entire area is fused together.
Cut lots of  circles with 1.5" circle punch.
 I returned my Fisker for a Paper Shapers. I was pleased as PUNCH. Insert silly giggle here.
If you have punched your way through about 1.5-2 rolls of wax paper, you are doing great.
Rip the cloth off of your lampshade.
Cut out the bulb holder with wire cutters.
Find the mid line of the shade, and add a center wire line.
Determine how many circles long you would like each row to hang, then double that amount.
My top row is 5 long so each chain is 10 circles long
My second row is 4 long so each chain is 8 circles long.
My bottom row is 3 long so each chain is 6 circles long.
I also added extra 8 circle chains to the top row to add depth and a bit more layering at the end.
As suggested in the tutorial, I used a cupcake pan to seperate out each strand for sewing.
So first, I filled my tray with 10 circles in each holder, then 8, then 6.
I sewed using the same technique shown in the original tutorial. She includes a video. I just fed each circle into the machine one after the other to form the chain. I did back stitch at the beginning and end so they wouldn't unravel.
Then begin hanging the chains at the midpoint of the chain on the wires of the upside-down wire shade.
Keep hanging until you get your desired look.
Install your standard single bulb light mount.
Attach your brass hooks to the ceiling on either side of the light mount.
Hang your upsidedown shell covered shade to the hooks directly against the ceiling.
Enjoy!


I was pleased that it doesn't look overly DIY and really changes the whole feeling of this space.
Why was this post brought to you by the Number 6?
A. Because I've been watching too much Sesame Street with Lucas.
 B. Because this entire project was a frustrating mess until I finally used 6 sheets of wax paper. Less sheets looks more sheer and shell like, however the punch worked perfectly with the extra sheets and it still left a shell like look. 

Now I only have 1 project left for this hallway! I want to add a mirror to the bathroom door.
So this was yet another DIY hang up do to a little quirk in the process.
What's your magic number?


Wednesday, November 16, 2011

For the Love of Plexi

With just a little more persistance, the wall is now complete! Lucas practically wiggled his way out of Bill's arms in excitement and anticipation as I changed the last few pictures.

Bill's truck was at the shop and some dear friends had loaned us their extra vehicle. Tonight we went to return it and they happen to live in the craft store mecca of our area. So Bill agreed we could make a family quest in search of Plexi-Glass. No luck at Michael's. No luck at AC Moore. They had 2 sheets of 5x7 for about $4 a piece. So we popped in at the Dollar Tree as a last ditch effort. There they were. There were only four, but they were a beautiful site. 4x6 frames with Plexi-Glass! This allowed me to switch out the plastic on the crucial frames and I added Command Strips to my parent's photo which was still low enough to make me nervous.


He couldn't stop laughing, giggling, talking, and singing to all the wonderful photos. A few could use some updating, but I'm just so thrilled they are up and ready to be loved!

Tuesday, November 15, 2011

Learning our Loved Ones and Limitations


At last, I have created the ultimate family wall. It is touchable, pullable, pokable, and very lovable. destructable! 

Lately our little pumpkin is pointing at his Daddy and saying 'DaDa', 'Daddy', or even the occasional 'Bill' and is  filled with snuggles for 'Mumma, Mummy, or Momma.' So we would love to teach him the other vital members of his family tree.

Lucas' Loved Ones wall was originally in his nursery behind the glider. It looked great up there aesthetically, but annoyed me that for him to look at the pictures he had to virtually crawl on your shoulders while you sat in the glider and peer over his lamp. The frames are from our local Christmas Tree Shop. They were $3-$5 a piece.

As always I was inspired by a post on Pinterest and once again it was from YoungHouseLove.
They showed how they baby proofed wall hanging photos. Imagining Lucas standing in front of his family members and being able to physically point or poke at them as he learned their names was irresistible.
They had switched out the glass for plexi-glass and used Command Strips to hang them. I had the perfect spot in mind! We have a mini hallway that passes the bathroom on the way to studio. P.S. Ta-da!! I have a french door! Bill installed this gorgeous door for me. I love that is cuts down the noise from the rest of the house, but doesn't make me feel cut off or isolated.

Only plexi-glass stood in my way! I checked the posting and Sherry had pulled the plexi from some cheap frames they had around the house. So I was left to fend for myself. I didn't know where it was sold or how it was sold. I didn't know if I would have to cut it down or if it came in picture sized sheets. I contemplated purchasing cheap frames with plexiglass covers from the dollar store, but I had more than 9 pictures so spending $9 seemed silly when I would be throwing out the frames. Someone mentioned thick transparency sheets, but where would I get those? Could he pull the plastic down from the corners? So basically, I was left looking for a very specific item that there isn't a high demand for. My favorite...When all your shopping trips are limited to the few hours between naps and entail carrying a 13 month old in tow, searching from store to store is not an appealing idea to me. So as the procrastinating perfectionist I am, if I didn't have a perfect plan it goes on the back burner.

 Today in Lucas' Early Intervention his PT offered the idea of laminating. Yes, I was so obsessed I was talking about it in Early Intervention. That was interesting. Laminate paper is easier to come by, but if I switched the picture I would have to re-laminate and heaven forbid I got a bubble in there! Not perfect.

Finally, I bit the bullet and went off to the local craft store. As I scanned the shelves for anything and everything that would work I saw a photo calendar. I could cut out the sleeves! This could work! 12 months means I have enough for 9 frames! But the price tag got me. $20 for something I was going to cut up, so back to the shelf it went.

But this made me realize, since I have 4x6 frames, I could cut out photo sleeves from any of my old photo albums! A perfect solution was born. Price tag $0. Nothing was holding me back.  I do have 1 8x10 and 1 5x7, but I hung them high enough on the wall that he shouldn't be able to reach them.

So in case the idea isn't self explanatory enough I took some photos of the step by step of what didn't work.

Here's my sassy little photo album circa 1999.

No holds bar, I started cutting. You have to cut directly around the photo as there isn't the extra room in the frame. Yes, there were some fun honeymoon pictures in this album circa 2005.

Make sure to leave one side of the sleeve alone. It makes a little plastic folder for the photo.

This makes me feel better about him being able to pull the plastic from the frame. If your little one has busy little fingers like mine, I think this might help.

Introducing his Great Grandma and his late Great Grandpa behind plastic!
The plastic actually reduces the glare that you get from actual glass so even with the little crinkles and creases I was still quite pleased with the result.

Now on his way to go bang on the glass of my new door (Bill thought ahead and got Tempered) Lucas can take a pit stop and visit his aunts, uncles, cousins, grand parents, and even great grandparents. Mom and Dad are there too of course and the 8x10 is of himself. We think it's good for children to think the world revolves around them  have self confidence.
Ahhhh. Now I can stop laying awake in bed thinking about plexi-glass.

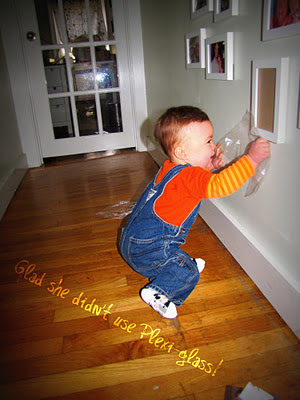
Update: I should have Kid tested before posting! Just as I feared Lucas' little fingers were able to rip out the plastic and photo in about .02 seconds. I guess tonight I'll be dreaming about Plexi-glass.


At least he had fun with it! Have you had a recent DIY disaster or struggled to find the exact materials for a perfect DIY idea?
Related Posts with Thumbnails