Friday, December 23, 2011

Star Wars Finger Puppets

I just couldn't wait to show you!
These are for my nearly 5 year old Nephew for Christmas. They were so much fun to make!
I have made printable patterns available through PDF. E-mail me at mcgowan.rebekah@gmail.com if you would like a copy of the free patterns for personal use.


Wednesday, December 14, 2011

Carrie's Christmas Creation!


My oh so very talented sister-in-law is joining us today as a guest blogger! I hope you enjoy her great tutorial for making Advent Calendar Christmas Trees:

I love Christmas, and am lucky enough to have a husband who is fully on board with my Christmas crafting addiction. This year, I really wanted to make an advent calendar. I love the sense of anticipation that comes along with an advent calendar but have been totally bored with the cheap paper or chocolate options available in stores. During an extensive Google and Pinterest search, I came upon some adorable options. (Here's a great roundup of ideas) My hesitation with most of the options I found was that they were aimed at families or took a far greater investment of time and money than I was up for. I knew I wanted to make some paper crafts, so I decided to re-purpose one as an advent calendar.

During my search, I stumbled across these adorable scrapbooking paper Christmas trees. I decided to make two of them and add pins to the bigger one from which to hang ornaments. This would be my grown-up friendly advent calendar.

First, I found some great holiday scrapbooking paper, double-sided is ideal. I bought this great pad of Martha Stewart Crafts paper. I also picked up some additional open stock pieces of green paper. I used this great tutorial, with a few minor modifications.
 Since I don't have a punch of any shape, I used a scrapbooking cutter to cut ovals about 1.5" long. I was also cutting out circles at the same time to make garlands, so I used an always handy cupcake tin to separate the colors and shapes. (I don't know if I would have made it through the cutting with out my husband's help!)


For my large tree, I used only shades of green but for my small tree I went for more variety. Once I had approximately a ton of ovals cut out, I wrapped the bottom and the top of my paper mache tree forms in dark green cardstock. Then, using a Sharpie marker, I curled the ovals about 1/2 way up. On the flat part, I put a dot of glue and then pressed the curls onto the tree form in a random order and in overlapping rows. I just used scrapbooking glue because I don't have a glue gun and it worked fine. When I got to the top of the trees, I cut a few more ovals in a smaller size to fill in the gaps.


At this point, my small tree was complete! Into my large tree, I stuck 24 white round head pins (pulled from my sewing kit). This was remarkably easy to do. I placed them so there would be enough space for the ornaments to hang. The final step was to make tiny ornaments for the advent calendar. Again, I cut little ovals using scrapbooking paper and wrote the numbers in black and silver Sharpie.


 I used tiny silver and brass jingle bells and snowflake buttons for the ornaments.
 Using a tapestry needle and thin ribbon, I strung each ornament with a date tag and placed them in a little bowl by the tree.


Each day, my husband and I enjoy finding today's ornament and slowly decorating our little paper Christmas tree.


Thanks to Becky for letting me write this guest post! I write a cooking blog, and couldn't figure out how paper trees would fit with the theme! I hope you are all having a great time getting in the mindset for the season. Do you have any favorite Christmas crafts that you return to year after year? Ones that it just wouldn't be the holidays without?

Happy Holidays!
                                                          ~CM
If there are any more talented crafters, aesthetic bakers, hand stitchers, crocheters, knitters, masters of the sewing machine, or creative people of any capacity or variety who would like to have a guest post, please feel free to send me a tutorial or post along with pictures of your work! I would be happy to consider you as a possible future guest post!

Monday, December 12, 2011

The Goose is Getting Fat!

It's feeling like Christmas around here and we have been very busy little Elfs lately!
In addition to our looming list of homemade gifts to make I of course had to make a few Holiday creations for Lucas.

We had a rod iron rack that held rod iron baskets of vegetables and towels next to our fridge. Unfortunately, the need to toddler proof forced us to take this down as Lucas loved to try to pull it on top of himself. We suffer from the same plight as many others. We neglected to realize that Stainless Steel is NOT MAGNETIC! Now that the magnetic black side was finally available for play, we wanted to give Lucas some much needed magnet fun. I had some magnet sheets from an old project in my craft drawer and I always have felt lying around so I decided to make Lucas some magnets. I started out with ABC. then used the scraps to make triangles, eyeballs, a line, a tounge, and a circle. I had also made him a felt tree with felt ornaments and a star and had attempted to hang it on the livingroom wall. Lucas immediately ripped it right off the wall along with some of the wall paint! We felt the fridge was a little safer. So I used the remaining magnet scraps for the back of my tree. There literally wasn't a scrap of magnet left in the end. I love that you don't need to put anything on the backs of the ornaments or star since felt sticks to felt. The new magnets are a big hit and they wander over to the non-stainless dishwasher from time to time as well.

We also have been working tirelessly on our Christmas presents. Some will have to remain secret of course, but I can reveal that I finished my pattern designs and began cutting on my StarWars finger puppets for my nephew.


This idea was born from talking to my nephew and then watching him play. He had recently seen Star Wars III for the first time and apparently it changed his life much like thousands of other little boys and girls across the world. He later found Lucas' finger puppets and instantly began an extravagant narrative with them. So I thought what better thing than to combine the two! Of course I thought this was a completely original and brilliant idea until I did a Pinterest search. Low and Behold others had come up with the same idea. Luckily I could only find a decent Darth Vader that seemed to be a worthwhile pattern to work from. This left me to be able to make my own designs for the others. I hope they come out as awesome as they are in my head!!

My little niece turned two back in September. She adores taking care of her baby dolls and Lucas whenever she can get a chance. So I thought for her I would make my first quilt. I actually can't believe I've never made a quilt completely on my own, but with the power of Pinterest and Youtube I made it through!


I only have the hand stitching left to do around the binding. I had a wonderful time making this little piece.
If you have never made a quilt and are looking to get started I highly recommend using a combination of  this tutorial for the construction , a quilt tying tutorial - you will need a curved needle- I used a 2", and I needed this youtube quilt binding tutorial inorder to really understand what they were talking about. I will try to add the quilt tying tutorial I used. I forgot to save it to Pinterest and unfortunately they have shut down their search feature at the moment.
We have also been stirring up a little Christmas fun in the kitchen as well! I planned to make a cheese log using this recipe. However this was for a vegan, gluten free party, so the cream cheese was Tofutti. I found that it doesn't harden as well as regular cream cheese so it wouldn't keep it's little square package form on its own like the recipe intended. So I just put it in a small bread dish I had from our wedding and topped it off similar to the tutorial. I used green onions for the green bow. I found they curl best with an actual pair of scissors and if you run it along the inside of the leaf rather than the outside.

 We also made our version of the santa hat brownie bites pictured here. Again since we were going for Vegan/ Gluten Free we ran into a few road blocks. It turns out you can not use Egg substitutes with boxed Gluten free brownie mix. It will end up a crusty, overflowing, undercooked, and somehow overcooked mess. At the last minute we decided to just go Vegan and drop the attempt for Gluten free. I used my favorite Wacky Chocolate Cake recipe (no eggs, no milk, yet super moist and rich) in a mini cupcake tin, frosted with Pillsbury vanilla frosting (no eggs, no milk, no gelatin) and topped with strawberries. Excuse our messy creations as we were unable to purchase tubed frosting since it typically has gelatin products and I still haven't overcome my fear of making my own piping in a pastry wrap tube. So we frosted with a knife and then used fondu forks to decorate. Bill ended up frosting most of them so I could get dressed for the party. What a great guy! He thought it was pretty awesome so he didn't mind the silliness or tediousness too much.

Well, I hope you are having a VERY merry Christmas season!
I have consulted with 2 potential creative cohorts who have said they may be willing to do a guest blog showcasing their amazing holiday creations while I try to keep my current works under wraps.
So keep posted for some gorgeous hand made crafts by Carrie and Heather.

Merry Christmas,


                                                           The McGowans
P.S. That Party I was talking about, well it was a crazy Christmas sweater party. And as you can imagine, we won.

Sunday, November 20, 2011

This Post was brought to you by the Number 6


Here is another little Home Decor creation to brighten up our little hallway to the Studio.
It's amazing how changing a door can change everything. All of a sudden, the hallway was about light. In the evening, that light story was a sad one. So we needed to change out the light fixture desperately.
I wanted something like this. 
However, my budget was closer to $5 than hundreds. I also had only about 8.5" to work with.
I started Googling and Pinterest searching for DIY Capiz Shell Chandeliers, and I found one.  However, her tutorial though fabulous is only a series of pictures and is for a much larger chandelier. This left me with a general idea and a large number of questions.
I did purchase a 5" lampshade at Christmas Tree Shop for $1. I bought 2 rolls of wax paper at the Dollar Tree.  I purchased a 1.5" circle punch with my 50% off coupon at AC Moore.
However, I couldn't tell how she attached the circles to the shade, and my hole punch was just making a frustrating mess until it finally jammed completely.
So here are my written instructions to make an
8.5" Faux Capiz Shell Chandelier
My apologies for my lack of images. Feel free to check the original tutorial for any images.
Materials
5" lampshade
2 rolls of standard size wax paper
1.5" circle punch
wire cutters
wire
2 small brass hooks
low wattage bulb (we used the type that looks like a candle)
standard single bulb light mount
 (similar to the ones found in a closet or unfinished basement)

Take 6 large sheets of wax paper.
Layer them ontop of eachother.
Cover with fabric.
Iron until the entire area is fused together.
Cut lots of  circles with 1.5" circle punch.
 I returned my Fisker for a Paper Shapers. I was pleased as PUNCH. Insert silly giggle here.
If you have punched your way through about 1.5-2 rolls of wax paper, you are doing great.
Rip the cloth off of your lampshade.
Cut out the bulb holder with wire cutters.
Find the mid line of the shade, and add a center wire line.
Determine how many circles long you would like each row to hang, then double that amount.
My top row is 5 long so each chain is 10 circles long
My second row is 4 long so each chain is 8 circles long.
My bottom row is 3 long so each chain is 6 circles long.
I also added extra 8 circle chains to the top row to add depth and a bit more layering at the end.
As suggested in the tutorial, I used a cupcake pan to seperate out each strand for sewing.
So first, I filled my tray with 10 circles in each holder, then 8, then 6.
I sewed using the same technique shown in the original tutorial. She includes a video. I just fed each circle into the machine one after the other to form the chain. I did back stitch at the beginning and end so they wouldn't unravel.
Then begin hanging the chains at the midpoint of the chain on the wires of the upside-down wire shade.
Keep hanging until you get your desired look.
Install your standard single bulb light mount.
Attach your brass hooks to the ceiling on either side of the light mount.
Hang your upsidedown shell covered shade to the hooks directly against the ceiling.
Enjoy!


I was pleased that it doesn't look overly DIY and really changes the whole feeling of this space.
Why was this post brought to you by the Number 6?
A. Because I've been watching too much Sesame Street with Lucas.
 B. Because this entire project was a frustrating mess until I finally used 6 sheets of wax paper. Less sheets looks more sheer and shell like, however the punch worked perfectly with the extra sheets and it still left a shell like look. 

Now I only have 1 project left for this hallway! I want to add a mirror to the bathroom door.
So this was yet another DIY hang up do to a little quirk in the process.
What's your magic number?


Wednesday, November 16, 2011

For the Love of Plexi

With just a little more persistance, the wall is now complete! Lucas practically wiggled his way out of Bill's arms in excitement and anticipation as I changed the last few pictures.

Bill's truck was at the shop and some dear friends had loaned us their extra vehicle. Tonight we went to return it and they happen to live in the craft store mecca of our area. So Bill agreed we could make a family quest in search of Plexi-Glass. No luck at Michael's. No luck at AC Moore. They had 2 sheets of 5x7 for about $4 a piece. So we popped in at the Dollar Tree as a last ditch effort. There they were. There were only four, but they were a beautiful site. 4x6 frames with Plexi-Glass! This allowed me to switch out the plastic on the crucial frames and I added Command Strips to my parent's photo which was still low enough to make me nervous.


He couldn't stop laughing, giggling, talking, and singing to all the wonderful photos. A few could use some updating, but I'm just so thrilled they are up and ready to be loved!

Tuesday, November 15, 2011

Learning our Loved Ones and Limitations


At last, I have created the ultimate family wall. It is touchable, pullable, pokable, and very lovable. destructable! 

Lately our little pumpkin is pointing at his Daddy and saying 'DaDa', 'Daddy', or even the occasional 'Bill' and is  filled with snuggles for 'Mumma, Mummy, or Momma.' So we would love to teach him the other vital members of his family tree.

Lucas' Loved Ones wall was originally in his nursery behind the glider. It looked great up there aesthetically, but annoyed me that for him to look at the pictures he had to virtually crawl on your shoulders while you sat in the glider and peer over his lamp. The frames are from our local Christmas Tree Shop. They were $3-$5 a piece.

As always I was inspired by a post on Pinterest and once again it was from YoungHouseLove.
They showed how they baby proofed wall hanging photos. Imagining Lucas standing in front of his family members and being able to physically point or poke at them as he learned their names was irresistible.
They had switched out the glass for plexi-glass and used Command Strips to hang them. I had the perfect spot in mind! We have a mini hallway that passes the bathroom on the way to studio. P.S. Ta-da!! I have a french door! Bill installed this gorgeous door for me. I love that is cuts down the noise from the rest of the house, but doesn't make me feel cut off or isolated.

Only plexi-glass stood in my way! I checked the posting and Sherry had pulled the plexi from some cheap frames they had around the house. So I was left to fend for myself. I didn't know where it was sold or how it was sold. I didn't know if I would have to cut it down or if it came in picture sized sheets. I contemplated purchasing cheap frames with plexiglass covers from the dollar store, but I had more than 9 pictures so spending $9 seemed silly when I would be throwing out the frames. Someone mentioned thick transparency sheets, but where would I get those? Could he pull the plastic down from the corners? So basically, I was left looking for a very specific item that there isn't a high demand for. My favorite...When all your shopping trips are limited to the few hours between naps and entail carrying a 13 month old in tow, searching from store to store is not an appealing idea to me. So as the procrastinating perfectionist I am, if I didn't have a perfect plan it goes on the back burner.

 Today in Lucas' Early Intervention his PT offered the idea of laminating. Yes, I was so obsessed I was talking about it in Early Intervention. That was interesting. Laminate paper is easier to come by, but if I switched the picture I would have to re-laminate and heaven forbid I got a bubble in there! Not perfect.

Finally, I bit the bullet and went off to the local craft store. As I scanned the shelves for anything and everything that would work I saw a photo calendar. I could cut out the sleeves! This could work! 12 months means I have enough for 9 frames! But the price tag got me. $20 for something I was going to cut up, so back to the shelf it went.

But this made me realize, since I have 4x6 frames, I could cut out photo sleeves from any of my old photo albums! A perfect solution was born. Price tag $0. Nothing was holding me back.  I do have 1 8x10 and 1 5x7, but I hung them high enough on the wall that he shouldn't be able to reach them.

So in case the idea isn't self explanatory enough I took some photos of the step by step of what didn't work.

Here's my sassy little photo album circa 1999.

No holds bar, I started cutting. You have to cut directly around the photo as there isn't the extra room in the frame. Yes, there were some fun honeymoon pictures in this album circa 2005.

Make sure to leave one side of the sleeve alone. It makes a little plastic folder for the photo.

This makes me feel better about him being able to pull the plastic from the frame. If your little one has busy little fingers like mine, I think this might help.

Introducing his Great Grandma and his late Great Grandpa behind plastic!
The plastic actually reduces the glare that you get from actual glass so even with the little crinkles and creases I was still quite pleased with the result.

Now on his way to go bang on the glass of my new door (Bill thought ahead and got Tempered) Lucas can take a pit stop and visit his aunts, uncles, cousins, grand parents, and even great grandparents. Mom and Dad are there too of course and the 8x10 is of himself. We think it's good for children to think the world revolves around them  have self confidence.
Ahhhh. Now I can stop laying awake in bed thinking about plexi-glass.

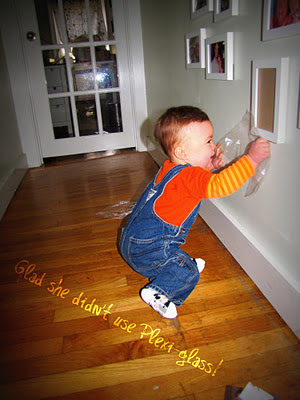
Update: I should have Kid tested before posting! Just as I feared Lucas' little fingers were able to rip out the plastic and photo in about .02 seconds. I guess tonight I'll be dreaming about Plexi-glass.


At least he had fun with it! Have you had a recent DIY disaster or struggled to find the exact materials for a perfect DIY idea?

Tuesday, October 25, 2011

Killin' it in the Kitchen


I am aware this isn't a cooking blog. Also, this isn't a 'being a mom' blog. However, being a mom does require a great deal of creativity and cooking! This creativity isn't always spun from a new innovative idea either. Sometimes the best ideas are the most tried and true. So I wanted to share this big, exciting, innovative, and NOT new idea with you all, because I'm hoping it will change my life or at least my week.
So here it is.
12 meals, 6 bags, 3 recipes, 1 hour
The idea is to take 3 recipes, double them, put them in freezer bags, freeze, thaw, slow cook in a crock pot, and eat. 
I found this idea on pinterest. (are you seeing a theme?)
I then followed the tutorials and recipes on this blog.

I added fresh broccoli, brussel sprouts, and carrots to the French Beef Dip and I substituted a frozen stir fry mix and some peas for the spinach in the Orange Beef Stew.I wanted to make sure we all got our veggies!!


It took me about an hour to do all the chopping and assembling and I couldn't be more excited to see my full freezer! The 'Slap Chop' came in quite handy. (Actually I have the Pampered Chef version, but we like to pretend it's the more ghetto and excitingly silly Slap Chop.)


Bill came home and was drooling over the bags wondering if we really had to freeze them or if we could start cooking them right away! We'll be sure to follow up with how we enjoy them and even more importantly how the little man likes them!

Oh yes, and we finished the rocking chair. Good as new!


What creative solutions have you come up with in the kitchen? Have you found any out of the box solutions to solve your own household time management issues?


Monday, October 24, 2011

Pumpkins with our Pumpkin

The Fall is my favorite season, hands down. We even got married in the fall and had our son in the fall, so it keeps getting better and better! One of my favorite things is carving pumpkins. Since Lucas is a little young for that, this year we thought painting pumpkins was an ideal choice. 
So we set our little man up with some taped up pumpkins and some paint and let him go wild. 


He had so much fun that he started crying when we put the paints away!! We had to get them back out and give him another pumpkin to paint!


He even gave himself a round of applause when he finished!

Did you make any awesome pumpkins this year or start any new family traditions?

Monday, October 10, 2011

Drive By Delights!


As I was driving home Sunday from church, I saw a fabulous sign. It said those magic words FREE. It was a 'day after yard sale- Free for all!' Usually things are pretty picked through at this point, but I grabbed this fabulous Child's rocking chair and an interesting bird house. 

Recently Lucas made a jump for it off of his changing table/ dresser. Thankfully he landed in his laundry basket. Needless to say, he is now changed in his crib to protect him from his own dare devil self. So we moved the Owl Mobile above his crib so he wouldn't  miss his little friends.


This left a blank dresser. So what better accessory than an Owl house! 
The dresser we purchased on Craigslist for $60. It was a hideous retro looking thing in a horrid yellow wood finish with wooden knobs. With MUCH sanding, painting, staining, and new knobs we made this gorgeous piece.This refurbish was inspired by YoungHouseLove. They actually inspired our whole nursery! I'll tell you about that whole remodel in a future post.


The owl house still  needs a few touch ups, but was in good enough shape I thought we could start enjoying it right away!
Of course, I had to accessorize with more owl friends.


Bill was thrilled with my free finds and went right to work sanding the rocking chair.  It's finish is pretty thick so he ended up quitting after an hour or so, but is excited to finish sanding so he can spray paint it as soon as possible.We put Lucas in it and he absolutely LOVED rocking in it. It is a perfect size with plenty of room for him to grow into. We couldn't be happier.

Related Posts with Thumbnails